Introduction
Getting ready to play
Tap the KORG iMS-20 icon on the iPad’s home screen; the app will start up. Make sure that the iPad’s volume is raised, and not muted. When the app has started up, tap the on-screen keyboard; when you hear sound, you’re ready to play.
Basic knowledge
In addition to playing the KORG iMS-20 as a single monophonic synthesizer, you can also use it with the included sequencer and drum machine for a broad range of music production possibilities. This section explains the basic knowledge that you’ll need to use the KORG iMS-20.
Using the synthesizer (MS-20)

Selecting the waveform and pitch
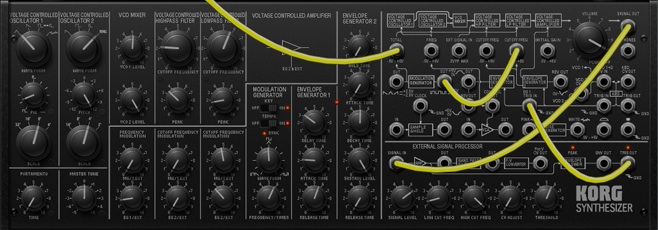
The VCO (Voltage Controlled Oscillator) determines the waveform and pitch. Use the WAVEFORM knob to select a waveform, and use the SCALE and PITCH knobs to specify the pitch. The waveform of the two VCOs can be set independently. The waveforms generated here will be processed by the filter and the other components to create the final sound.
Modifying the tone
The VCF (Voltage Controlled Filter) modifies the brightness of the sound by applying filters to the waveform produced by the VCO. You can use the high-pass filter and low-pass filter to make the sound thinner or more mellow.
Controlling the volume
The VCA (Voltage Controlled Amplifier) and EG (Envelope Generator) let you specify how the volume will change over time, from the beginning of the note to when it decays to silence. Lengthening the ATTACK TIME will make the note begin slowly, and lengthening the RELEASE TIME will make the note end slowly.
Creating time-varying change
In addition to using the EG (Envelope Generator) to vary the volume over time, you can also use it to apply time-varying change to the pitch or tone. For example, you could make the pitch fall when the note begins, or make the tone brighten gradually. In a similar way, you can use the MG (Modulation Generator) to apply cyclical change to the pitch, tone, or volume.
Patching
For more sophisticated sound-creating possibilities, you can change the way that the MS-20’s modules are connected, or you can add a noise generator. Try out various connections and come up with your very own settings!
Using the sequencer

Specifying the note timing
GATE specifies the note timing and duration. Steps where the GATE is other than 0% will sound a note. Instead of the GATE, you can also use VOLUME to make a note sound. In this case, set GATE to other than 0% to specify the length of the note, and use the VOLUME to specify triggering and volume. By using VOLUME and GATE, you can specify the timing, duration, and volume of the notes.
Specifying the pitch
Use PITCH and OCTAVE to specify the pitch. You can create phrases by specifying the pitch of each step’s note.
Modifying the tone
Use PARAMETER and VOLTAGE to specify the tone. You can modify the synthesizer’s tone for each step.
Using the drum machine

Specifying the note timing
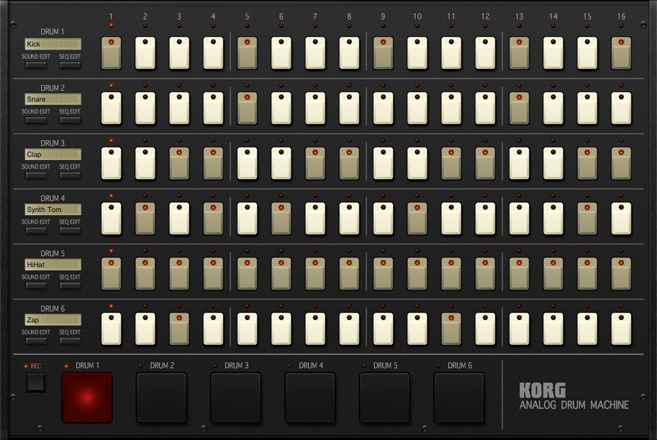
If a part’s step switch is on, that part will sound a note at the corresponding step. “SEQ EDIT” lets you create detailed settings for each step such as the note’s duration, volume, and panning.
Modifying the tone
“SOUND EDIT” lets you specify a sound created by the MS-20 for each of the six parts. For each sound, you can edit the synthesizer or select one of the sounds that are provided.
Patterns
The KORG iMS-20 uses short phrases called “patterns” as its smallest playback unit. Each pattern lets you simultaneously use the following components (synthesizer, drum machine, etc.).
- Synthesizer: 1 unit
- Sequencer: 1 unit
- Drum machine: 1 unit (6 parts)
- Mixer
- Synth effect
- Master effect You can also modify a pattern in realtime as it plays, or switch between multiple patterns in realtime during playback.
Songs
Multiple patterns that you’ve created can be arranged in a desired order to create a “song.”
Session
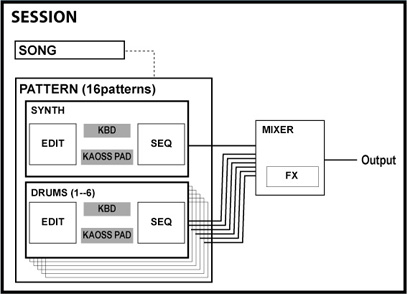
The patterns and songs that you create are collectively managed as a “session.” Whether you’re creating and playing just a single pattern, or whether you’re using multiple patterns to create a song, all your data is saved as a session. The following illustration shows how a session is structured.

Data saved for each session
- Song: 1
- Patterns: 16
- Drum sounds: for the 6 parts
- Mixer / Master Effect settings
- Tempo / Swing settings
Data saved for each pattern
- Synth sequence data
- Drums sequence data
- Synth sound
- Kaoss Pad settings
- Pattern Change - Step Grid settings
Basic operation
Knobs
You can choose one of the following two operating modes. Select this choice in the GLOBAL section’s Settings.
| Linear | Use your finger to move the knob up/down. |
| Rotary | Move your finger as though turning the knob. |
You can also make fine adjustments to a parameter by flicking (quickly brushing your finger over it).
| Flick up | Increases the parameter by a small amount. |
| Flick down | Decreases the parameter by a small amount. |
| Flick right | Increases the parameter by an even smaller amount. |
| Flick left | Decreases the parameter by an even smaller amount. |
Patching
When you tap a jack with your finger, a cable will appear; slide your finger to another jack to make a connection. You can connect output jacks to input jacks. To disconnect a cable, tap the output jack or input jack of a connected cable, slide your finger somewhere other than a jack, and then release it.
Scrolling to switch screens
In the SYNTH screen, where the synthesizer and sequencer are shown above and below, you can scroll the displayed area by sliding your finger vertically on a location other than a knob or switch. If the SYNTH EDIT section’s “ZOOM MS-20” is on and the “PATCH PANEL” is visible, you can slide vertically to see the sequencer’s patch section.
Flicking to switch screens
When in SYNTH mode and the SYNTH EDIT section’s “ZOOM MS-20” is on, you can switch between “CONTROL PANEL” and “PATCH PANEL” by flicking your finger on a location other than a knob or switch.
Double-tapping to switch screens
When in SYNTH mode, you can double-tap the VOLTAGE CONTROLLED AMPLIFIER section of MS-20 to turn “ZOOM MS-20” on and switch to “CONTROL PANEL.” By double-tapping the logo area in the patch section, you can switch to “PATCH PANEL.” You can also double-tap to return from “CONTROL PANEL” or “PATCH PANEL.”